Wednesday, July 25, 2007

NTLDR or NTDETECT.COM Not Found

If you get an error that NTLDR is not found during bootup,

If you have FAT32 partitions, it is much simpler than with NTFS.
Just boot with a Win98 floppy and copy the NTLDR or NTDETECT.COM files
from the i386 directory to the root of the C:\ drive.

For NTFS:

Insert and boot from your WindowsXP CD.
At the first R=Repair option, press the R key
Press the number that corresponds to the correct location for the installation of Windows you want to repair.
Typically this will be #1
Enter in the administrator password when requested
Enter in the following commands (X: is replaced by the actual drive letter that is assigned to the CD ROM drive.
COPY X:\i386\NTLDR C\:
COPY X:\i386\NTDETECT.COM C:\
Take out the CD ROM and type exit

Monday, July 16, 2007

Yahoo Hidden Emoticons

Yahoo Hidden Emoticons *Bet You Don't Know*, View and Send Hidden Emoticon Which arent available in the messenger


Image:
Symbol: :o3
Description: puppy dog eyes


Image:
Symbol: :-??
Description: I don't know


Image:
Symbol: %-(
Description: not listening


Image:
Symbol: :@)
Description: pig


Image:
Symbol: 3:-O
Description: cow


Image:
Symbol: sad2fd1.gif|)
Description: monkey


Image:
Symbol: ~:>
Description: chicken


Image:
Symbol: @};-
Description: rose


Image:
Symbol: %%-
Description: good luck


Image:
Symbol: **==
Description: flag


Image:
Symbol: (~~)
Description: pumpkin


Image:
Symbol: *-smile.gif
Description: idea


Image:
Symbol: 8-X
Description: skull


Image:
Symbol: =smile.gif
Description: bug


Image:
Symbol: >-)
Description: alien


Image:
Symbol: :-L
Description: frustrated


Image:
Symbol: [-O<
Description: praying


Image:
Symbol: $-)
Description: money eyes


Image:
Symbol: :-"
Description: whistling


Image:
Symbol: b-(
Description: feeling beat up


Image:
Symbol: smile.gif>-
Description: peace sign


Image:
Symbol: [-X
Description: shame on you


Image:
Symbol: \:D/
Description: dancing


Image:
Symbol: >:/
Description: bring it on


Image:
Symbol: winkk.gif)
Description: hee hee


Image:
Symbol: :-@
Description: chatterbox


Image:
Symbol: ^smile.gif^
Description: worship


Image:
Symbol: :-j
Description: oh go on


Image:
Symbol: (*)
Description: star


Image:
Symbol: o->
Description: hero


Image:
Symbol: o=>
Description: billy


Image:
Symbol: o-+
Description: april


Image:
Symbol: (%)
Description: yin yang


I think you can figure out wat exact symbol is to be used winkk.gif

Please leave a thanks if you liked this post

Friday, July 13, 2007

15 Coolest Firefox Tricks Ever...

Everybody’s favorite open-source browser, Firefox, is great right out of the box. And by adding some of the awesome extensions available out there, the browser just gets better and better.

But look under the hood, and there are a bunch of hidden (and some not-so-secret) tips and tricks available that will crank Firefox up and pimp your browser. Make it faster, cooler, more efficient. Get to be a Jedi master with the following cool Firefox tricks.

1) More screen space. Make your icons small. Go to View - Toolbars - Customize and check the “Use small icons” box.

2) Smart keywords. If there’s a search you use a lot (let’s say IMDB.com’s people search), this is an awesome tool that not many people use. Right-click on the search box, select “Add a Keyword for this search”, give the keyword a name and an easy-to-type and easy-to-remember shortcut name (let’s say “actor”) and save it. Now, when you want to do an actor search, go to Firefox’s address bar, type “actor” and the name of the actor and press return. Instant search! You can do this with any search box.

3) Keyboard shortcuts. This is where you become a real Jedi. It just takes a little while to learn these, but once you do, your browsing will be super fast. Here are some of the most common (and my personal favs):

  • Spacebar (page down)
  • Shift-Spacebar (page up)
  • Ctrl+F (find)
  • Alt-N (find next)
  • Ctrl+D (bookmark page)
  • Ctrl+T (new tab)
  • Ctrl+K (go to search box)
  • Ctrl+L (go to address bar)
  • Ctrl+= (increase text size)
  • Ctrl+- (decrease text size)
  • Ctrl-W (close tab)
  • F5 (reload)
  • Alt-Home (go to home page)

4) Auto-complete. This is another keyboard shortcut, but it’s not commonly known and very useful. Go to the address bar (Control-L) and type the name of the site without the “www” or the “.com”. Let’s say “google”. Then press Control-Enter, and it will automatically fill in the “www” and the “.com” and take you there - like magic! For .net addresses, press Shift-Enter, and for .org addresses, press Control-Shift-Enter.

5) Tab navigation. Instead of using the mouse to select different tabs that you have open, use the keyboard. Here are the shortcuts:

  • Ctrl+Tab (rotate forward among tabs)
  • Ctrl+Shft+Tab (rotate to the previous tab)
  • Ctrl+1-9 (choose a number to jump to a specific tab)

6) Mouse shortcuts. Sometimes you’re already using your mouse and it’s easier to use a mouse shortcut than to go back to the keyboard. Master these cool ones:

  • Middle click on link (opens in new tab)
  • Shift-scroll down (previous page)
  • Shift-scroll up (next page)
  • Ctrl-scroll up (decrease text size)
  • Ctrl-scroll down (increase text size)
  • Middle click on a tab (closes tab)

7) Delete items from address bar history. Firefox’s ability to automatically show previous URLs you’ve visited, as you type, in the address bar’s drop-down history menu is very cool. But sometimes you just don’t want those URLs to show up (I won’t ask why). Go to the address bar (Ctrl-L), start typing an address, and the drop-down menu will appear with the URLs of pages you’ve visited with those letters in them. Use the down-arrow to go down to an address you want to delete, and press the Delete key to make it disappear.

8) User chrome. If you really want to trick out your Firefox, you’ll want to create a UserChrome.css file and customize your browser. It’s a bit complicated to get into here, but check out this tutorial.

9) Create a user.js file. Another way to customize Firefox, creating a user.js file can really speed up your browsing. You’ll need to create a text file named user.js in your profile folder (see this to find out where the profile folder is) and see this example user.js file that you can modify. Created by techlifeweb.com, this example explains some of the things you can do in its comments.

10) about:config. The true power user’s tool, about.config isn’t something to mess with if you don’t know what a setting does. You can get to the main configuration screen by putting about:config in the browser’s address bar. See Mozillazine’s about:config tips and screenshots.

11) Add a keyword for a bookmark
. Go to your bookmarks much faster by giving them keywords. Right-click the bookmark and then select Properties. Put a short keyword in the keyword field, save it, and now you can type that keyword in the address bar and it will go to that bookmark.

12) Speed up Firefox. If you have a broadband connection (and most of us do), you can use pipelining to speed up your page loads. This allows Firefox to load multiple things on a page at once, instead of one at a time (by default, it’s optimized for dialup connections). Here’s how:

  • Type “about:config” into the address bar and hit return. Type “network.http” in the filter field, and change the following settings (double-click on them to change them):
  • Set “network.http.pipelining” to “true”
  • Set “network.http.proxy.pipelining” to “true”
  • Set “network.http.pipelining.maxrequests” to a number like 30. This will allow it to make 30 requests at once.
  • Also, right-click anywhere and select New-> Integer. Name it “nglayout.initialpaint.delay” and set its value to “0″. This value is the amount of time the browser waits before it acts on information it receives.

13) Limit RAM usage. If Firefox takes up too much memory on your computer, you can limit the amount of RAM it is allowed to us. Again, go to about:config, filter “browser.cache” and select “browser.cache.disk.capacity”. It’s set to 50000, but you can lower it, depending on how much memory you have. Try 15000 if you have between 512MB and 1GB ram.


14) Reduce RAM usage further for when Firefox is minimized. This setting will move Firefox to your hard drive when you minimize it, taking up much less memory. And there is no noticeable difference in speed when you restore Firefox, so it’s definitely worth a go. Again, go to about:config, right-click anywhere and select New-> Boolean. Name it “config.trim_on_minimize” and set it to TRUE. You have to restart Firefox for these settings to take effect.

15) Move or remove the close tab button. Do you accidentally click on the close button of Firefox’s tabs? You can move them or remove them, again through about:config. Edit the preference for “browser.tabs.closeButtons”. Here are the meanings of each value:

  • 0: Display a close button on the active tab only
  • 1:(Default) Display close buttons on all tabs
  • 2:Don’t display any close buttons
  • 3:Display a single close button at the end of the tab bar (Firefox 1.x behavior)

Google Talk Bold Text Trick

This trick is an extremely easy trick, which lets you boldify the text you are sending to your contact.

All you have to do is type the text between asterisks, with no spaces after the first asterisk and no spaces before the last. Here is an example:

*LawiZ* would become LawiZ

* LawiZ * would stay the same.

* LawiZ* would stay the same.

Optimize Your BitTorrent Download Speed

Optimize Your BitTorrent Download Speed


1. Hack the max half-open TCP connections

If you’re on XP sp2, your TCP connections are limited to a maximum of 10. This might hurt your downloading speed because it wont let you connect to as much peers as you want. It is supposed to slow down viruses because their spreading strategy is to connect to a high amount of ip numbers, but it could cripple your torrent downloads.

A nice way to fix this is to download this patch.

Note: Some people report that their antivir reports the patch to be a Virus, This is not the case. Check out http://www.lvllord.de/ for more details on this

The patch allows you to set the maximum allowed connections to any number you want. Any number between 50 and 100 is ok (more is NOT always better).

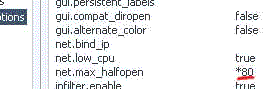
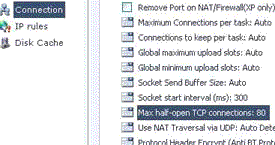
Next you need to configure your torrent client to allow 50-100 max half-open TCP connections

uTorrent: Options > Preferences > Advanced options > net.max_halfopen

tcputorrent

Bitcomet: Options > Preferences > Connection > max half-open TCP

tcpbitcomet

Now you’re ready to go…

A third point of interest is that some “windows updates” revert your tweaked tcp connections back to 10. So it’s wise to check this every now and then. You can check this by going to (in windows xp) Start > Control Panel > Administrative Tools > Event Viewer > System… Look for event 4226 (sort by event).

event

For more details about Windows XP SP2 and Event ID 4226 read David Kaspar’s excellent post

If there are a lot of daily occurences it’s likely that the max amount of half-open tcp connections was set back to 10. Or you’re infected with some nasty spyware…

2. Torrent Client Configuration

In order to apply these tips you need to know your maximum up- and download speed. You can test your bandwidth over here (stop all download activity while testing). Also make sure that you applied the tips provided in our previous posts.

Note that there’s a difference between kb/s (kilobits/second) and kB/s (kilobytes/second). To be precise, kB/s = kb/s divided by 8. In this tutorial we use kB/s (like most torrent clients do). This means that you might need to calculate your max speed in kB/s yourself if the speedtest only gives you the results in kb\s (so divide by 8 then).

Settings 1-4 can be found in the options, settings or preference tab of most torrent clients.

1. Maximum upload speed

Probably the most important setting there is. Your connection is (sort of) like a pipeline, if you use you maximum upload speed there’s not enough space left for the files you are downloading. So you have to cap your upload speed.

Use the following formula to determine your optimal upload speed…

80% of your maximum upload speed

so if your maximum upload speed is 40 kB/s, the optimal upload rate is 32kB/s

But keep seeding!

2. Maximum download speed

Although setting your maximum download speed to unlimited may sound interesting, in reality it will only hurt your connection. If you still want to be able to browse properly, set your maximum download speed to:

95% of your maximum download speed

so if your maximum download speed is 400 kB/s, the optimal download speed is 380kB/s

3. Maximum connected peers per torrent

Yet another setting that you don’t want to max out. I experimented quite a lot with the max connected peers settings and came to the conclusion that both high and low number hurt the download speed of a torrent. The following setting worked best for me.

upload speed * 1.3

so if your maximum upload speed is 40 kB/s, the optimal amount of connected peers per torrent is

40 * 1.3 = 52

I didn’t noticed a difference for fast or slow connections here.

4. Maximum upload slots

1 + (upload speed / 6)

so if your maximum upload speed is 30 kB/s, the optimal number of upload slots is

1 + (30 / 6) = 6


3. More Tips

Check seeds and peers
A simple tip, but very important. Always look for torrents with the best seed/peer ratio. The more seeds (compared to peers) the better (in general). So 50 seeds and 50 peers is better than 500 seeds and 1000 peers. So, be selective.

Change the default port.
By default, BitTorrent uses a port 6881-6999. BitTorrent generates a lot traffic (1/3), so isp’s like to limit the connection offered on the these ports. So, you should change these to another range. Good clients allow you to do this, just choose anything you like. If you’re behind a router, make sure you have your ports forwarded (portforward.com) or UPnP enabled.

Disable Windows Firewall
It sucks. Windows Firewall hates P2P and often leads a life of it’s own. So disable it and get yourself a decent (free) firewall, Kerio or Zone Alarm for example.

Turn on Encryption
Encrypting your torrents will prevent throttling ISP’s from limiting your BitTorrent traffic. Check out how to enable encryption in Azureus, uTorrent, and Bitcomet, the three most popular torrent clients.

Optimize your internet connection
The TCP optimizer is a freeware utility that optimizes your internet connection. I found it very useful and it helped speeding up my connection for regular internet activity and for downloading torrents. Just download it, and move the slidebar to your maximum download rate (note that it’s in kb/s). Don’t try to set it higher because that will hurt your download speeds!

Last but not least… Buy a faster connection…

Happy Torrenting!

Firefox Inside Firefox

You know that many of us spend lot of our computing time on the internet and most of that time we use Firefox tabs to open all our favorite Sites and services inside Firefox right?, yes, Gmail inside Ff, Yahoo inside Ff, ebay inside Ff, Banking inside Ff ect. ect. ect….With all these favorites inside Firefox, How about Opening Firefox inside Firefox? Not bad huh? and its really easy too just type in this url in a new tab in Firefox and there you go! Firefox inside Firefox!


chrome://browser/content/browser.xul

25 Ways To Improve Your Site Today

Now, a website is hard work and usually there are no quick fixes but this list should provide you with a few pointers to make some updates today. If you like, it can also be used as a basis for a quality check document.

Usability/Accessibility

Because it matters. If people can’t use your site, they won’t stay.

1. Navigation: Ensure that your navigation is easy to use and consistent. You may be able to use it, but could a newcomer find the information they desire?
2. Search: If you don’t have a search box, then why not? Sometimes navigation isn’t enough. It may not be a 5 minute job to add a custom search facility, but it is extremely quick to add a third party search like Google’s.
3. Click here: Why? Change this phrase everywhere on your site. It doesn’t make sense out of context. The user has to read the whole paragraph (which they probably won’t) to understand why they should click there. Consider phrases like “Download the profit/loss graph” or “Listen to the podcast entitled food for thought.”
4. Title & Alt Attributes: Use them how they are supposed to be used. If you haven’t used any at all, then a quick fix will be to start adding them to navigation and other elements on every page.
5. General: If you’ve got any code snippets that could annoy the user, like resizing browser windows or opening new pages in a new window, then remove them. Just because you like something a particular way, your users may not. Don’t take over their desktop.

Search Engine Optimisation - SEO

Because you want to be found. (On-page tips only here)

1. Titles: Add consistent, relevant but different titles (title tag) to every page in your site. If you already have titles, check that they are short and describe the content of the page.
2. Link around: Internal links to your pages (I’m thinking from the body copy here) are just as important as external links. Besides the usability gain, you have the unique opportunity of specifying your link and title text.
3. Strengthen keywords: Probably the quickest thing you can do. Highlight some keywords and phrases and add a strong tag (bold) around them. This shouldn’t be overused but can provide some positive results if used sparingly.
4. Headers: The correct use of headers (in a semantic, logical manner) can produce fantastic results. The H1 tag is the most important - try using some keywords in there.
5. Overkill: It seems whenever I speak to someone about SEO and give them some tips, they go way overboard. This can really ruin all the hard work you’ve done for the user. So remember, optimise with the user in mind. And stay away from dodgy SEO stuff - every time you use black-hat SEO, a kitten steps on broken glass.

Design/Development Process

Design is our passion. Let it show.

1. Images: By all means create beautiful images, but don’t forget to optimise them for the web. You may have a quick connection - not everybody does.
2. Design comes from scratch(pad): Don’t necessarily fire up your graphics editor before thinking about the design. It can only take 10 minutes to draw (you know - pencil and paper) various layouts and wireframe the design. Doing this will make you think more about placement of elements and less about the aesthetics.
3. Contrast/Text-size: Ensure that contrast levels and text sizes are ‘acceptable’ - There are no golden figures (although recommendations are available) to aim for but at least check with other people using different setups. Just because you have perfect 20:20 vision doesn’t mean that anyone can read your site.
4. Consistency: There’s nothing worse (OK - an exaggeration, yes) than a website that doesn’t function consistently. A user can find it hard enough to learn how a website is put together without having to remember all the little quirks and foibles on your site.
5. Testing: Check (or get others to check) the site under as many conditions as possible. Try to do this every time the site has a significant update. It’s worth it as it only takes a minute or two.

Content

That’s why people visit the site.

1. Text/Whitespace: There’s a big trap that often people fall into. Whitespace. How many times have you heard “we need to fill that space and cram the text in a bit more” ? More text in a single area isn’t a good thing. It can make it harder and less enjoyable to read the content. It you had a shop would you cram as many products in as possible? No. You’d let them have space so they get noticed. Do the same with your text.
2. Write for your audience: Can people understand your text? Think about your audience and reword those confusing sentences.
3. Corporate Boasting: Which is more useful ~ “We provide 200 megaunits of wobble-sprockets to our worldwide, global markets” ~ or ~ “We can provide a wobble-sprocket to you anywhere in the world.” Speak to the reader and engage them. Don’t waffle.
4. Use interest: If someone has read an article or item of content, then it is fair to assume that they were interested. Instead of leaving them high-and-dry after an article, point them somewhere related, whether it be another article or a product perhaps.
5. Objectives: When writing content, make a little mental note of what your goal is for the page (e.g. encourage registration) and try to guess what the users goal is (e.g. to get at information.) Match the two (e.g. “to find this information simply sign up”) and you’re golden.

Off-Site

Because it’s not all about you.

1. Hang out: For reasons surrounding traffic and respect. Go to forums, blogs and portals within your niche and hang out. Offer advice, link up with people and gain respect. Doing this for 10 minutes a day will improve your image and lead to quality, niche-lead traffic. A bonus. Oh, and don’t spam your community.
2. Learn: As well as handing out advice, listen. Whether it be listening to colleagues, competition or potential clients you are bound to learn an awful lot just by witnessing other people’s actions.
3. Encourage viral promotion: Not particularly in a gimmicky-email-newsletter fashion (that takes budget and time) but in a social fashion. Tell your friends and colleagues (and clients if relevant) something unique about you, your company or website and chances are they’ll pass it on. 5 minutes of blabbering could lead to heaps of traffic.
4. Be yourself: When interacting online, don’t conform to internet stereotypes - just be yourself. Doing this will mean that you are natural when interacting online and more likely to take a similar approach as you would offline. So, take your offline business ways online.
5. Spam: As in don’t spam. Every time you spam, you are adding disrespect to your own company/site. It’s the real-world equivalent of pushing a leaflet into a potential customer’s mouth.

And there we go. I hope this list is useful and has shown you how easy it is to improve various aspects of your website and its marketing. This isn’t exhaustive by any means - as I said earlier it takes effort and time to really get your site near-perfect. Evolution is the key: tweak, feedback, measure and repeat. Oh, and before you go looking, no, I don’t always practice what I preach!

How To Access Blocked Websites

Approach 1: There are websites Anonymizer who fetch the blocked site/ page from their servers and display it to you. As far as the service provider is concerned you are viewing a page from Anonymizer and not the blocked site.

Approach 2: To access the blocked Web site. type the IP number instead of the URL in the address bar. But if the ISP software maps the IP address to the web server (reverse DNS lookup), the website will remain blocked.

Approach 3: Use a URL redirection service like tinyurl.com or snipurl.com. These domain forward services sometimes work as the address in the the url box remain the redirect url and do not change to the banned site.

Approach 4: Use Google Mobile Search. Google display the normal HTML pages as if you are viewing them on a mobile phone. During the translation, Google removes the javascript content and CSS scripts and breaks a longer page into several smaller pages. [link] View this website in Google Mobile

Approach 5: Enter the URL in Google or Yahoo search and then visit the cached copy of the page. To retrieve the page more quickly from Google's cache, click "Cached Text Only" while the browser is loading the page from cache.

Approach 6: A recent Oreilly story on accessing blocked websites suggested an approach to access restricted web sites using Google language tools service as a proxy server. Basically, you have Google translate your page from English to English (or whatever language you like). Assuming that Google isn’t blacklisted in your country or school, you should be able to access any site with this method. Visit this site via Google Proxy

Approach 7: Anonymous Surfing Surf the internet via a proxy server. A proxy server (or proxies) is a normal computer that hides the identity of computers on its network from the Internet. Which means that only the address of the proxy server is visible to the world and not of those computers that are using it to browse the Internet. Just visit the proxy server website with your Web browser and enter a URL (website address) in the form provided.

This page has a long list of proxies. You can either choose one yourself or let the service choose a random proxy for you. Also bookmark the DMOZ directory of free web-based proxy services and DMOZ directory of free proxy servers

Update: China appears to have moved beyond simply blocking access to a Web site with IP filters and may now be employing packet filters to scan individual packets for undesirable information, said Duncan Clark, managing director at telecommunication analyst BDA China Co. Ltd.
_________________

How To Increase Your Connection Speed Greatly *works*

How to increase your connection speed GREATLY *Works*

Before we start I'd like to thank elicomp for making the following screenshot.

Ok, now with the tutorial...
Download TCPOptimizer from:
Code:

Code:

http://www.speedguide.net/files/TCPOptimizer.exe
http://cstrike.gamewarriors.com/downloads/miscfiles/TCPOptimizer.exe
http://netrom.org/programs/TCPOptimizer.exe

Thanks to Chillenderwijs for getting the new links.

(It doesn't require installing)
And fill the boxes as shown in the screenshot.

That's it. very simple, very easy, and it works! I noticed great improvements.
Oh, and just incase, create a restore point before you tweak it. This program hasn't messed up anything yet, but you can't be too safe.

How To Speed Up Your Ram

How to Speed up Your RAM

Introduction

It's official: DDR400 memory is now the formal standard. Now that the Jedec committee has made its decision, RAM and motherboard makers finally have some guidelines on integration. DDR400, a.k.a. PC3200 RAM, had been plagued by incompatibility issues and an embarrassing lack of performance improvements. Without any official standard at all, trying to find a perfect match between RAM and the motherboard had been like playing poker blindfolded.

Admittedly, running fast DDR400 RAM is still not without its problems. The older DDR-1 technology runs up against 400 MHz memory clock speeds like a bull against a brick wall. Once launched, the DDR-2 standard will provide an entirely new design for RAM chips, changes to the board layout and decreased signal voltage - and that means clock speeds of up to 667 MHz. Don't expect the new technology until late 2003, though. Until then, you can optimize your BIOS settings to harness every little bit of DDR400 RAM you have or to resolve stability issues.

Older systems also stand to gain from the new modules. Even if you can't run the DDR400 modules at their top memory bus frequency of 400 MHz, you can still tweak the timing parameters to maximize performance at lower clock speeds. Faster memory modules are ideal for this purpose. More often than not, tightening your CAS latency or RAS-to-CAS delay will speed up your system more than jacking up your memory bus would. This article explains the concepts and technologies of memory timings and provides some tweaking advice. This information applies equally to RAM standards such as DDR333 and DDR266, allowing you to tweak just about any system.


Tweaking Modules

Clock speeds and timings can be faster with overclocking modules. Kingston, for example, makes PC3500 modules for up to 433 MHz.

You can start out with special tweaking modules that exceed the DDR400 standard and offer particularly high settings for clock speeds and timings. The modules are available from Corsair, Geil, Kingston, Mushkin and others as PC3500 or PC3700. While standards by these names don't really exist, the names indicate how much the modules can be overclocked.

But DDR RAM doesn't really spread its wings until it's installed in dual-channel motherboards that add together the memory bandwidths from two DDR modules. These mainboards sport Nvidia nForce 2 chipsets for AMD CPUs, or Intel 7205 (and, in the future, 865 and 875) chipsets for Intel processors.

Check Prices
KingMax 1GB PC2700 DDR Price: $105.99
Corsair 1GB PC3200 DDR Price: $85.00
Corsair 1GB PC3200 DDR Price: $79.99
KingMax 512MB PC2700 DDR Price: $43.91
Kingston 512MB PC4200 Price: $52.99
Kingston 1GB PC2700 DDR Price: $107.99
Kingston 512MB PC3200 Price: $38.99
Corsair 1GB PC3200 DDR Price: $116.00
Kingston 1GB PC4200 DDR2 Price: $100.10
Kingston 1GB PC3200 DDR Price: $78.99


There is one catch - you always have to have two memory modules. BIOS often puts the brakes on the RAM timings so that the system remains stable, and that's where most of the optimization comes in. In fact, RAM manufacturers such as Corsair and Geil even sell matched pairs of memory modules as a bundle especially for dual-channel systems.


Tweaking RAM


The temptation that's inherent in faster RAM modules is to ratchet up your memory bus clock if you have an older system. For example, you can install DDR400 memory on a motherboard with a VIA KT333 or KT400 chipset for AMD CPUs. While the chipsets don't officially support the new RAM standard, you can still find tweaking options in the BIOS menus that will raise the clock speed from DDR333 to DDR400 levels.

If the system is unstable with memory clocked at 400 MHz, though, you can forget about fine-tuning the frequency. The memory clock moves in parallel to the front side bus clock and can only be adjusted in large increments, such as from DDR333 to DDR400. The adjustment itself is normally made by fiddling with the ratio to the front-side bus clock; 3/3 corresponds to DDR333 with the front-side bus at 333 MHz, while 4/3 stands for DDR400 memory clock speeds. For the RAM clock to be increased in smaller intervals, you will have to increase the front-side bus clock in lock-step.

The advantages of stepping up your memory clock in an AMD Athlon XP system, on the other hand, are few and far between. In fact, setting the memory bus to 400 MHz and the front side bus to 333 MHz can even slow down performance. Instead, you'll get better results from optimizing the timing parameters for the faster memory in BIOS.


Timings Bigger Than Bus Clock

The timing settings have just as big an impact on RAM performance as the bus frequency. After all, the data bus can only capitalize on the vast bandwidth if data is read out of the RAM chips and made available at a fast enough clip. And when the data is accessed from different memory zones, there are a whole slew of processes that stop up the flow of data. The memory timings define the speed with which all the individual steps involved in accessing RAM are done. It's more than worth your while to go to the trouble of optimizing these settings: your performance could increase by up to ten percent. What's more, optimizing your timing parameters can be more advantageous than increasing your bus clock. High-quality DDR333 RAM with quick timings will outperform a DDR400 module with timing settings that have been deliberately rolled back to increase the clock speed.

When tweaking your memory, the first step is to deactivate the automatic RAM configuration. When this function is activated, the mainboard reads the SPD chip (Serial Presence Detect) on the memory module to obtain information about the timings and clock speed and to adjust the settings accordingly. However, these settings, which the RAM manufacturer stores in the EEPROM chip, are very conservative in order to ensure stable operation on as many systems as possible. With a manual configuration, you can customize your settings for your own system - in most cases, the RAM modules will remain stable even when they exceed the manufacturer's specifications.

Nor should you gloss over checking your timing settings if you have inexpensive memory modules. Generic providers are famous for cutting corners during production and burning the wrong values into the SPD chips. Unhappy buyers are forced to struggle with poor performance or system crashes without knowing exactly why.


More To It Than CL Settings

he most important RAM timings are CAS latency (CL), RAS-to-CAS delay (tRCD) and RAS precharge time (tRP). Many memory modules have specifications such as PC2700-2.0-2-2.0 or PC3200-3.0-3-3.0. The first of these seemingly inscrutable numbers describes the memory type, the latter three the aforementioned timings. Other manufacturers merely list the CAS latency as CL 2.0 or CL 3.0. While it is an important performance feature, not listing the other parameters is a big disadvantage for the buyer because each one has a similar impact on system performance.

To see for yourself how big this impact is, take a look at the performance benchmarks for MPEG-4 encoding. We've also included a brief run-down of the most important timing parameters, short explanations and tips on the best settings at the end of the article, under the heading "How to Tweak Your RAM in BIOS." If clear information on possible performance settings is conspicuously absent from your brand-name RAM, you can consult the data sheets on the Internet (see "RAM Manufacturers").

To better understand the timing parameters, you should know about everything involved in accessing memory. The "RAM Timings" chart will give you an overview of how it works. A read process is initiated when the controller in the motherboard chipset selects the memory module that contains the data. The controller addresses the right chip on the module and the data it holds. The cells of the chip are arranged in a matrix and are addressed using the row and column addresses. Each intersection represents one memory bit.


Benchmarks

The results are for the RAM clock (PC2700 = DDR333; PC2100 = DDR266), CAS latency (CL), RAS-to-CAS delay, RAS precharge time and row active time.


Enter The Matrix

The memory controller first sends the row address for the cell it wishes to address to the module logic. After a certain period of time, tRCD (RAS-to-CAS delay), the module makes the contents of the row available in interim storage. On modern RAM chips, this process takes two to three clock cycles. You can even have fractions such as 2.5 clock cycles (CL 2.5), since DDR RAM can send control and data signals on both the rising and falling edges of the clock signal, i.e., twice per clock cycle.

Once the contents of the row have been sent to interim storage, the controller will send out the CAS signal (column address strobe) that transmits the column address for the memory cell. It takes an amount of time equal to tCL (CAS latency) until the contents of the selected cell have been sent to the output register of the memory chip.

In BIOS, you can set the number of clock cycles available for the timings tRCD and tCL. The lower these values, the better your performance. A CL setting of 2.0 or even 1.5 is only possible on the fastest of modules.

If you are reading out adjacent data from the same memory row, the only factor determining the speed of the access is the CL timing, since the controller already knows the row address and doesn't have to query it again. Whenever the controller has to address different rows in a RAM chip, the time tRAS (row active time) will pass before it can move from one row to the next. The time tRAS is increased by the time tRP (RAS precharge time), which is needed to charge the circuits up to a higher voltage level. In other words, even fast memory modules need at least seven clock cycles for the entire process.

Modern DDR RAM chips are subdivided once again into four segments (banks), each of which represents a separate memory zone. Bank interleaving allows zones in different chip banks to be addressed simultaneously, thereby increasing the data rate. While data is being read out of one memory bank, a new data zone can be addressed in another bank. You can specify in BIOS how many RAM banks of the chip can be addressed at the same time. The fastest setting is "four."


Top Performance With 1 GB Of RAM Or More

Another important performance criterion is the amount of RAM installed. Image and video-processing applications get an enormous boost from more memory. Readings taken with Content Creation Winstone prove that Windows 2000 and XP systems don't really take off until they have 1 GB or more of RAM. The benchmarks show how heavily system performance depends on the amount of memory. Indeed, 512-MB RAM is the bare minimum for fast Windows XP systems. Long gone are the days of Windows 98 and Me, when 512 MB was the most memory that the majority of systems needed.

The maximum amount of RAM depends solely on the motherboard and its chipset. For more information, go to the "Memory Support" table below. In x86 systems, however, the maximum memory allowed is 3.5 GB, no matter how much RAM has been installed. The CPU simply cannot address any more memory. The remaining capacity is reserved to control the PCI circuits.

You should install as few RAM modules as possible. Reducing the number of chips on the module will also enhance performance and stability. The modules generally consist of eight or 16 chips.

The number of memory modules you use will have a direct impact on your command rate. The command rate specifies the number of clock cycles the memory controller needs to activate the modules and chips. If you've filled all your memory banks, you'll generally have to increase the rate from one to two clock cycles to keep your system stable. Unfortunately, that will also impair performance by up to three percent.


RAM Manufacturers

Manufacturer Website
Corsairwww.corsairmemory.com
Crucialwww.crucial.com
Dataramwww.dataram.com
Geilwww.geil.com.tw
Infineonwww.infineon.com
Kingmaxwww.kingmax.com.tw
Kingstonwww.kingston.com
Micronwww.micron.com
Mushkinwww.mushkin.com
Samsungwww.samsungsemi.com
Transcendwww.transcendusa.com
Twinmoswww.twinmos.com
OCZ Technologywww.ocztechnology.com


Memory Timings

Optimizing the timing parameters will speed up the processes involved in accessing RAM. The memory controller first determines the row address of the storage cell it intends to address. The column address is communicated once the time tRCD has transpired. The time tCL then passes while the data is transferred to the output register. The process can start all over again after waiting tRAS plus tRP.


Memory Support With Motherboard Chipsets

Chipset Memory Type - Max. Memory

AMD
ALI M1647 DDR2662) 3072 MByte
Nforce DDR2663) 1536 MByte
Nforce 2 DDR4003) 3072 MByte
SIS 735 DDR266 1024 MByte
SIS 745 DDR333 1536 MByte
SIS 746 DDR333 3072 MByte
SIS 746FX DDR400 3072 MByte
VIA KT266A DDR266 2048 MByte
VIA KT333 DDR333 4092 MByte4)
VIA KT400 DDR333 4092 MByte4)
VIA KT400A DDR4003) 4092 MByte4)

Intel
ALI M1671 DDR333 3072 MByte
ALI M1681 DDR400 3072 MByte
Intel 7205 DDR3333) 4092 MByte4)
Intel 845E DDR266 2048 MByte
Intel 845PE DDR333 2048 MByte
Intel 865P DDR333 4092 MByte4)
Intel 865PE DDR4003) 4092 MByte4)
Intel 875P DDR4003) 4092 MByte4)
SIS 645 DDR333 3072 MByte
SIS 648 DDR333 3072 MByte
SIS 648FX DDR400 3072 MByte
SIS 655 DDR3333) 4092 MByte4)
VIA P4X266A DDR266 4092 MByte4)
VIA P4X333 DDR333 4092 MByte4)
VIA P4X400 DDR333 4092 MByte4)
VIA P4T400 DDR400 4092 MByte4)

1) Fastest DDR RAM standard supported; DDR266 = PC2100; DDR333 = PC2700; DDR400 = PC3200
2) With C1 stepping DDR333
3) Dual-channel memory interface
4) 3576 MB available


How To Tweak Your RAM In BIOS

Motherboard BIOS menus offer numerous settings to optimize your memory. These settings modify RAM functions that, while basic in nature, are often given widely different names. We'll briefly explain the options. The usual values are listed in brackets; the ideal setting is underlined. We've also included examples of what the settings might be called in different BIOS versions. Please note that not all BIOS menus offer all the settings.

Automatic Configuration (On/ Off) (DRAM Auto, Timing Selectable, Timing Configuring) If you want to manually configure your memory timings, you will have to deactivate the automatic RAM configuration.

Bank Interleaving (Off/ 2/ 4) (Bank Interleave) DDR RAM memory chips are made of four banks. Addressing all four banks through interleaving at the same time will maximize your performance.


Burst Length (4/8 )

The burst length specifies how many data blocks are sent in one transmission cycle. Ideally, one transmission will fill one memory row on the L2 cache found in modern Pentium 4 and Athlon XP CPUs. That is equal to 64 Bytes, or eight data packets.

CAS Latency TCL (1.5/ 2.0/ 2.5/ 3.0) (CAS Latency Time, CAS Timing Delay) The number of clock cycles that pass from the column being addressed to the data arriving in the output register. The memory manufacturer lists the best possible setting as the CL rating.

Command Rate CMD (1/ 2) (Command Rate, MA 1T/2T Select) Number of clock cycles needed to address the memory module and the memory chip with the desired data zone. If your memory banks are full to capacity, you will have to raise this rate to two, resulting in a considerable drop in performance.

RAS Precharge Time TRP (2/ 3) (RAS Precharge, Precharge to active) Number of clock cycles needed to precharge the circuits so that the row address can be determined.

RAS-to-CAS Delay TRCD (2/ 3/ 4/ 5) (RAS to CAS Delay, Active to CMD) Number of clock cycles that pass between the row address being determined and the column address being sent out. Setting this value to two clock cycles can enhance performance by up to four percent.

Row Active Time TRAS (5/ 6/ 7) (Active to Precharge Delay, Precharge Wait State, Row Active Delay, Row Precharge Delay) Delay that results when two different rows in a memory chip are addressed one after another.

Memory Clock (100/ 133/ 166/ 200 MHz) (DRAM Clock) Specifies the clock speed of the memory bus. This rate is normally specified relative to the front-side bus clock. DDR technology (double-data rate) doubles the data rate given by the actual bus clock speed.

Top 15 Ways to Extend Your Laptop’s Battery Life

Laptops tend to lose their charm quickly when you’re constantly looking for the nearest power outlet to charge up. How do you keep your battery going for as long as possible? Here are 15 easy ways to do so.

1. Defrag regularly - The faster your hard drive does its work - less demand you are going to put on the hard drive and your battery. Make your hard drive as efficient as possible by defragging it regularly. (but not while it’s on battery of course!) Mac OSX is better built to handle fragmentation so it may not be very applicable for Apple systems.

2. Dim your screen - Most laptops come with the ability to dim your laptop screen. Some even come with ways to modify CPU and cooling performance. Cut them down to the lowest level you can tolerate to squeeze out some extra battery juice.

3. Cut down on programs running in the background. Itunes, Desktop Search, etc. All these add to the CPU load and cut down battery life. Shut down everything that isn’t crucial when you’re on battery.

4. Cut down external devices - USB devices (including your mouse) & WiFi drain down your laptop battery. Remove or shut them down when not in use. It goes without saying that charging other devices (like your iPod) with your laptop when on battery is a surefire way of quickly wiping out the charge on your laptop battery.

5. Add more RAM - This will allow you to process more with the memory your laptop has, rather than relying on virtual memory. Virtual memory results in hard drive use, and is much less power efficient. Note that adding more RAM will consume more energy, so this is most applicable if you do need to run memory intensive programs which actually require heavy usage of virtual memory.

dvd

6. Run off a hard drive rather than CD/DVD - As power consuming as hard drives are, CD and DVD drives are worse. Even having one in the drive can be power consuming. They spin, taking power, even when they?re not actively being used. Wherever possible, try to run on virtual drives using programs like Alcohol 120% rather than optical ones.

7. Keep the battery contacts clean: Clean your battery’s metal contacts every couple of months with a cloth moistened with rubbing alcohol. This keeps the transfer of power from your battery more efficient.

8. Take care of your battery - Exercise the Battery. Do not leave a charged battery dormant for long periods of time. Once charged, you should at least use the battery at least once every two to three weeks. Also, do not let a Li-On battery completely discharge. (Discharing is only for older batteries with memory effects)

9. Hibernate not standby - Although placing a laptop in standby mode saves some power and you can instantly resume where you left off, it doesn’t save anywhere as much power as the hibernate function does. Hibernating a PC will actually save your PC’s state as it is, and completely shut itself down.

10. Keep operating temperature down - Your laptop operates more efficiently when it’s cooler. Clean out your air vents with a cloth or keyboard cleaner, or refer to some extra tips by LapTopMag.com.

11. Set up and optimize your power options - Go to ‘Power Options’ in your windows control panel and set it up so that power usage is optimized (Select the ‘max battery’ for maximum effect).

12. Don’t multitask - Do one thing at a time when you’re on battery. Rather than working on a spreadsheet, letting your email client run in the background and listening to your latest set of MP3’s, set your mind to one thing only. If you don’t you’ll only drain out your batteries before anything gets completed!

13. Go easy on the PC demands - The more you demand from your PC. Passive activities like email and word processing consume much less power than gaming or playing a DVD. If you’ve got a single battery charge - pick your priorities wisely.

14. Get yourself a more efficient laptop - Laptops are getting more and more efficient in nature to the point where some manufacturers are talking about all day long batteries. Picking up a newer more efficient laptop to replace an aging one is usually a quick fix.

15. Prevent the Memory Effect - If you’re using a very old laptop, you’ll want to prevent the ‘memory effect’ - Keep the battery healthy by fully charging and then fully discharging it at least once every two to three weeks. Exceptions to the rule are Li-Ion batteries (which most laptops have) which do not suffer from the memory effect.

Bonus Tip #1: Turn off the autosave function. MS-Word’s and Excel’s autosave functions are great but because they keep saving regular intervals, they work your hard driver harder than it may have to. If you plan to do this, you may want to turn it back on as the battery runs low. While it saves battery life in the beginning, you will want to make sure your work is saved when your battery dies.

Bonus Tip #2
: Lower the graphics use. You can do this by changing the screen resolution and shutting off fancy graphic drivers. Graphics cards (video cards) use as much or more power today as hard disks

Monday, June 11, 2007

How to add subtitles to movies

So lets start.first you have to find your subtitle, check out these sites for that
Code:http://www.divxplanet.net/
http://www.divxsubtitles.net/index.php
http://divxstation.com/subtitles.asp
http://www.divxmovies.com/subtitles/
http://www.subtitles.ro/
http://subtitles.images.o2.cz/
http://forum.divxsweden.net/ipdl.php
http://divxstation.com/searchSubtitles.asp
http://www.subtitles.de/main.php?l=search
http://extratitles.to/
http://subtitles.7nights.net/
http://ftp.build.bg/DivX/Subtitles/
http://free.bol.bg/dijon/Subtitles/
http://extratitles.to/
http://www.napisy.info/
http://www.paginialbe.net/subtitrari/
http://www.napisy.org/
http://www.hot.ee/subland/ (Estonian, English and Finland subs)
http://sub.divx.ee/ (Estonian subs)
http://frigorifix.com/ (French Subs)
http://www.kloofy.com (Asian Subs)
http://www.divxsweden.net (Swedish subs)
http://www.legendasdivx.com (Portuguese)
http://www.calorifix.net/forums/accueil/accueil.php (French)
http://dvd.umedia.ee/index.php?leht=subtiitrid (Estonian subs)
http://subclub.future.ee/subtitles.php (Estonian subs)
http://subtitrari.softpedia.com (Romanian subs)
http://www.legendas-ed2k.com (Portuguese subs)
http://napisy.org/ (Polish Subs)
http://www.titlovi.com/Default.aspx?page=subtitles (Yugoslavian Subs)
http://livada.pondi.hr/index2.htm (Serbian, Slovenian, Croat, Macedonian)
http://www.serbiancafe.ws/divx/ (Serbian subs)
http://www.central-subtitles.com
http://www.nlondertitels.com/ (Dutch subs)
http://www.podnapisi.net/
http://www.undertexter.se/ (Swedish subs)
http://dvd.stuff.gr/subtitles/ (Greek subs)
http://www.dvd4arab.com/
http://www.ondertitel.com/
http://pan4o.com/downloads/sub/
http://subscene.com/
http://www.opensubtitles.org/en
http://www.subtitles-divx.net


After u have found the required subtitleYou unzip it and then you get a file with a name and the extension is .srtPut it in the same folder where the movie is and rename the file to the name of the movie example

Name movie: Pirates of The Caribbean 2 - Dead Mans Chest.DvdRip.CD1Name subtitle: xxxx.srt

Rename it to:Name movie: Pirates of The Caribbean 2 - Dead Mans Chest.DvdRip.CD1Name subtitle: Pirates of The Caribbean 2 - Dead Mans Chest.DvdRip.CD1.srt

and lo when you play the movie the sub are shown


THE problems faced:sometimes the subs and the audio are not synchronised. this is because of the different bit rate. so check the bitrate before downloading.or download different subs for the same movie until it matches.(max file size is 80KB) so it wont be a probs.


Enjoy !

Wednesday, June 6, 2007

Protecting yourself when downloading using µTorrent

If you've been using BitTorrent to download any of the more popular files, such as the latest episode of some major TV show, you may have found yourself receiving lots of "Wasted" data. This is data that has been discarded after being deemed corrupt or invalid by your BitTorrent client. Every so often, you will have received more wasted data than the size of the files you are downloading!


This is happening because Anti-P2P organizations are actively polluting P2P networks with fake peers, which send out fake or corrupt data in order to waste bandwidth and slow down file transfers. At its worst, when downloading major copyrighted torrents, as much as a fourth of the peers you are connected to can be attributed to various Anti-P2P agencies. There is also a much more serious side to this. Once you've established a connection to one of these fake "peers", your IP has been logged and will most likely be sent to the RIAA/MPAA!
But there is a way to fight back! If you are using the latest µTorrent (1.5), you can employ a little known feature called IP filtering. The author of µTorrent has gone out of his way to hide it, but it's there nonetheless.

But before we can activate this filter, we need to retrieve a list of currently known Anti-P2P organization IPs.
This is most easily done by downloading the latest blacklist from Bluetack (the same people who wrote SafePeer for the Azureus BT client) at http://www.bluetack.co.uk/config/nipfilter.dat.gz This list is updated daily, and contains all known Anti-P2P organizations, trackers and peers, aswell as all known Goverment/Military IP addresses as collected by the Bluetack team. Once downloaded, extract and rename the file original filename "ipfilter.dat" to "ipfilter.dat" in preparation for the final step.


EDIT ADD: FOR EVEN HIGHER SECURITY
Paranoid pipfilter.dat.gz
Description: This list is all the blacklists bluetack makes put into a .dat.gz file for emule, now this will block some isp and also alot of things one may not think needed. Use at your own risk. This will have to be unzipped and then replace the .dat file manualy, in the config folder.
Version: Filesize: 0 bytes
Added on: 29-Apr-2005 Downloads: 39034
http://www.bluetack.co.uk/modules.php?name=Downloads&d_op=getit&lid=68
rename to "ipfilter.dat"
security related:
http://www.bluetack.co.uk/modules.php?name=Downloads&d_op=viewdownload&cid=2


To make the list available to µTorrent, you need to place the renamed ipfilter.dat file in %AppData%\uTorrent. Go to Start -> Run and type %AppData%\uTorrent at the box. Click Ok button and a folder will appear.


After placing the ipfilter.dat in this folder, start µTorrent and go into preferences (Ctrl+P), then click on "Advanced". In the right hand pane, make sure that "ipfilter.enable" is set to true, and then close the dialog. That's it for the configuration.


You can verify that the list has been loaded by looking under the "Logging" tab of µTorrent, where you should see the line "Loaded ipfilter.dat (X entries)".


Congratulations! You are now protected against most of the garbage-distributing peers; and the likelyhood of the RIAA or MPAA knocking at your door has been substantially reduced! I'd go as far as to say that you shouldn't be using µTorrent at all without this feature turned on! And even if the law enforcement side of it doesn't bother you, you should still be interested in reducing the amount of garbage data that gets sent your way, which in turn leads to quicker downloads, and isn't that something everybody should strive for?

Template Design | Elque 2007